Real Estate Video in 2022
Real Estate Videography is a simple cinematic art form that benefits everyone involved in the selling process. The photographer has the benefit of a fulfilling career that allows them to see beautiful properties and photograph subjects that need minimal direction. The real estate agent benefits from creating stand-out content that adds value to the property as well as their own personal brand and online appearance. The buyer gets to experience the property without an in-person visit and the seller has a cherished visual memory of their home. Essentially, with good Real Estate Video, everybody wins!
In this article we want to talk about how to shoot luxury Real Estate Videos. We’ll discuss the right gear and software, the right mindset, and shooting the property from the ground and the air. We’ll also go over how to do an on-camera appearance with the realtor and how to make them feel comfortable while filming. We’ll also touch on the editing process. After finishing this article, you’ll know what you need to do to create a great Real Estate Video!
In this article we want to talk about how to shoot luxury Real Estate Videos. We’ll discuss the right gear and software, the right mindset, and shooting the property from the ground and the air. We’ll also go over how to do an on-camera appearance with the realtor and how to make them feel comfortable while filming. We’ll also touch on the editing process. After finishing this article, you’ll know what you need to do to create a great Real Estate Video!
|
|
Types of Real Estate Videos
What are we referring to with the phrase "Real Estate Video" anyway? Today, we’re talking about any video done with specific intention of showing off a property for marketing use on a listing website. Some of these videos are simple clips of the home with music playing over the background. Some are full-on luxury cinematic experiences with appearances by Real Estate Agents as tour guides in a property walkthrough video with lifestyle shots and neighborhood details. Some can even be a quick phone video shot for social media. |
For our intentions though, any video specifically created to showcase a listed property for sale is a Real Estate Video.
|
The workflow of a Real Estate Videography tends to follow a similar structure to photography, but with a few extra steps. They involve the following processes:
|
|
The Gear
Camera Body
Camera body options available to today’s real estate videographers are incredibly varied and diverse, with types and prices ranges all across the spectrum. So to narrow it down, you’ll want to have a camera that shoots at least 1080p (4k is even better) at at least 24 frames per second (but 60fps will allow you to slow your footage down.) You should also find a camera that can shoot on what’s called a “flat” color profile such as SLOG which allows you to get well-balanced footage in areas with dark shadows and extreme brights.
We recommend using some of the new mirrorless cameras that have come out in recent years. (We use Sony at Sand and Stone Media.)
Camera Body Recommendations
Lenses
For Real Estate Video, a wide lens is a MUST! Find a lens that is between 14-18mm. Any wider and you’ll get a strange fish-eye effect. Any closer and you won’t be able to capture the interior spaces. You can get a “fixed focal-length” lens, but if you can afford a “variable zoom” lens, you’ll capture more angles and better details.
For Real Estate Video, a wide lens is a MUST! Find a lens that is between 14-18mm. Any wider and you’ll get a strange fish-eye effect. Any closer and you won’t be able to capture the interior spaces. You can get a “fixed focal-length” lens, but if you can afford a “variable zoom” lens, you’ll capture more angles and better details.
Stabilizer or Gimbal
What sets a quality real estate video apart is the clean smoothness of a moving shot, the kind that is only achievable with a stabilizer and some balanced leg work. Some entry-level stabilizers called use small plates to counter-weight the camera while the videographer balances it manually. These are usually called Glidecams or handheld stabilizers and, if you’re willing to put in a little extra work, they can get some extremely smooth looking shots.
A gimbal stabilizer does a fantastic job of balancing the camera electronically and will speed up the shooting process while helping you get incredibly cinematic looking footage of the home and property grounds. Add a second handle for even better stability.
Gimbal Recommendations
Glidecam: Flycam Redking
Gimbal: DJI Ronin SC2 (for larger cameras)
DJI Ronin S (for smaller cameras)
Side Grip: Smallrig Side Handle
|
Aerial Video
If you don’t want to stick a camera to the end of a swimming pool cleaning pole, you’ll absolutely want to invest in a drone to get aerial footage of the home and the neighborhood. If you plan on making money with your drone photos, you’ll need a Part 107 Commercial Drone License from the Federal Aviation Administration. Drone Recommendations Budget-Level: DJI Mini Entry-Level: DJI Mavic Air 2S Commercial-Level: DJI Inspire 2 |
Microphones
In order to get clean audio for Real Estate Agent Video Walkthroughs, clip-on lavalier microphones are perfect. Some microphones like the Tascam DR 10l record audio straight to an SD card, while others like the Sony UWP-D transmit the audio to the video camera. Either of these options are doable, but each has trade-offs. The straight-to-SD card TASCAM audio will need to be synced up to your video clips later, but with the SONY, you will not be able to record audio unless you’re filming video at the same time. What we recommend doing is filming the on-camera appearances with a wireless transmitter microphone and any off-camera audio narration with an SD card microphone.
In order to get clean audio for Real Estate Agent Video Walkthroughs, clip-on lavalier microphones are perfect. Some microphones like the Tascam DR 10l record audio straight to an SD card, while others like the Sony UWP-D transmit the audio to the video camera. Either of these options are doable, but each has trade-offs. The straight-to-SD card TASCAM audio will need to be synced up to your video clips later, but with the SONY, you will not be able to record audio unless you’re filming video at the same time. What we recommend doing is filming the on-camera appearances with a wireless transmitter microphone and any off-camera audio narration with an SD card microphone.
Lighting
You won’t likely need to hoist around a 3-point lighting set, but it can be helpful to have a top light for your camera to brighten up dark spaces. We recommend this LumeCube Bi-Color Top LIght because it’s cheap, not too bright and you can adjust the color temperature.
You won’t likely need to hoist around a 3-point lighting set, but it can be helpful to have a top light for your camera to brighten up dark spaces. We recommend this LumeCube Bi-Color Top LIght because it’s cheap, not too bright and you can adjust the color temperature.
Settings
The ideal setting for any real estate shoot would be 4k at 60 frames per second exported in 1080p HD at 24 frames per second. These settings will help you slow your footage down and crop in slightly during post production. You can also shoot at 24p, but you will not be able so slow the footage down. Keep your shutter speed set to twice your framerate (so 1/125 at 60p or 1/50 at 24p) and do your best to not crank your ISO if you can help it. If you keep your Aperture at around f4, you’ll get a sharper final image. If you need more light, lower your aperture before changing other settings.
When shooting real estate, the idea is to capture the house in it’s most flattering state, but homes tend to have dark rooms and bright windows. This means you’ll usually have to choose between exposing for either outside or inside. To mitigate this issue and increase the "Dynamic Range", some cameras have “flat” color profiles like D-Log, S-Log or C-Log, which make the image more gray, but help the camera absorb a wider spectrum of light. This helps make the windows looks less bright and the interior less dark... essentially more even or "flat." So, we recommend using one of these color profiles and learning how to use it because it will make all the difference when we apply some coloring work in the final real estate video.
To summarize: 4k at 60p or 24p
Shutter Speed: 2x your frame rate (so 1/125 at 60p or 1/50 at 24p)
Aperture: f4
ISO: low as you can
Picture Profile: LOG
Preparation and Mindset
Now that you have an idea of what gear you’ll need, let’s talk about having the right mindset when it comes to your real estate video.
Know your Gear. Take the time to practice with your gear and understand the correct settings and how Shutter Speed, Aperture, ISO, Color Profiles and natural lighting all work together to create a well-balanced shot.
Prepare. Look up the property on google maps beforehand. Find any older photos or footage of it. Visualize a game plan and write out a shot list.
Seek the Light. Learn to see the light and plan a time of day to capture the home at its peak. Depending on where the home is facing, the light could be casting strange shadows or getting hit straight on with full harsh sunlight. Take not of where the home is facing and do your best to schedule according to the best light.
Find the Story. Every home has a unique feature here and there, and the realtor will know exactly what stands out, so ask both the realtor and homeowner what they think about features and shoot those things. If there is a video script, meticulously shoot the exact items the script is referring to. The final video will line up video footage, the real estate agent's appearance, their audio and any music to tell a cinematic story, so have all of those things in mind.
Don’t Rush it. If you can schedule at least 1-2 hours to have the place to yourself, you’ll be able to take your time and give the home it’s due attention without stressing it. Eventually, you’ll want to find an efficient balance, but you should never sacrifice quality because you’re too rushed and missed something important.
Maintain Perspective. Remember that the reason you’re shooting this property is to create a work of art that communicates the emotion value through photographic storytelling. You want to show this place at its absolute best so treat it with care.
Filming on Location
The very first thing you do when you get to the property is turn on all the lights and do a quick cleanup. Ideally, this will be finished before you arrive, but if not, do your best to tidy the place up and notice hoses left out or bottles in the bathroom. We've learned that bathroom photos look much better with closed toilet bow lids so watch for those.
The Real Estate Agent on-Camera Walkthrough
When a Real Estate Agent appears on-camera to introduce the property, it adds a whole new level of creative value. They get to introduce themselves and give the property some human emotion.
A well-written script that flows through the home creates a cinematic story, so ensure that the Agent has written one. The listing description works well here, but feel free to get creative and collaborate on different ideas with the real estate agent. In any case, do your best to make sure that the agent is ready beforehand.
To get a good on-camera appearance from an agent, find a place to shoot their intro, outro and any other locations they would like to be in front of. Usually the front door or a scenic viewpoint is a great intro or outro point, and ideas can range from the agent opening the front door and saying “What’s up?” to pulling up in a luxury vehicle, coming down the stairs, etc.
Mic them up, get them on camera, and record the very first take just in case. Some ways to help agents feel more comfortable in front of the camera is to empathize and encourage them. You can encourage them to be a little more upbeat on this take, or tone it down some. Help them find conversational tones that don’t sound like they’re reading or reciting a script. You can say “Just pretend you're explaining this house to your mom,” or “Try using your arms a little more.”
Every real estate agent has camera comfort levels but we’ve found that the most important things are to simply bring a calm energy that helps the agent feel themselves.
If they’re reading a script off-camera, it helps to find a quiet carpeted room for best sound acoustics.
|
|
|
Neighborhood Footage
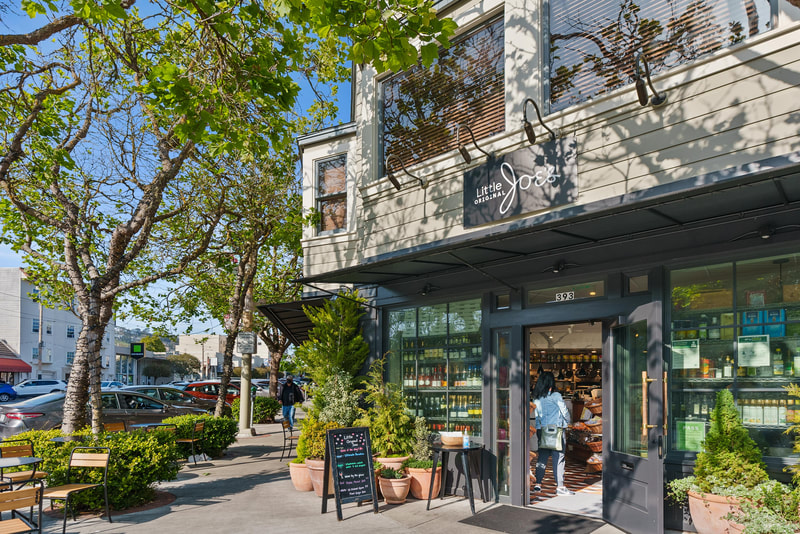
Neighborhood features are a huge seller for properties, so head out to get some footage of different places nearby like boutique shops, parks, shopping centers and art. Neighborhood footage gives a real estate video context and navigation.
Neighborhood features are a huge seller for properties, so head out to get some footage of different places nearby like boutique shops, parks, shopping centers and art. Neighborhood footage gives a real estate video context and navigation.
Before wrapping up, double check your work, it’s terrible when you get home and realize you forgot a room or an angle.
The Edit Bay
Editing a Real Estate Video takes hours of practice, creative commitment and sometimes a tedious amount of meticulous technical work and it’s impossible to give an exact process on how to edit since there are so many ways to do it. That being said, there are certain things that you can do regardless of your creative or editing style. The editing process typically follows this general workflow:
- File Organization
- Creating Proxy Files
- Culling
- Music Selection
- Creative Storytelling
- Technical Elements
- Speed Ramps
- Warp Stabilizer
- Location Tags
- Color
- Audio
- Coloring
- Export and Delivery
File Organization
Ideally, you should use your own personal system for organizing files, but we recommend keeping everything backed up on two separate hard drives during the editing process. You never know what could happen with your files. Create 4 folders, “All Clips,” “Audio,” “Project Files,” and “Exports.” Add your video and file clips accordingly.
At Sand and Stone Media, we edit using the Adobe software. For video projects, we use Premiere Pro, Media Encoder, After Effects and Photoshop. This guide will explain the process using those programs.
|
Proxies
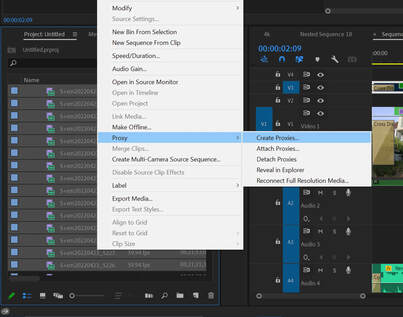
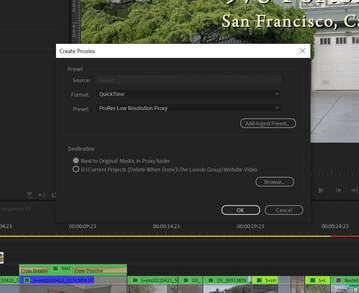
Creating proxy files is essential if you’ve been shooting in 4k at 60fps like we recommended. Premiere Pro allows you to create a copy of the original video file that’s significantly lower in quality and then using those lighter files to edit with. Premiere Pro does this internally by linking your original file to the lower quality proxy file. To create proxy files, simply select all of your project files in your Project File Bin, then right click and select “Proxy,” then “Create Proxies.” |
|
A new window will pop up with some options. You can create your own Format and Preset, but simply using “Format: Quicktime” and “Preset: ProRes Low Resolution Proxy,” will do what you need.
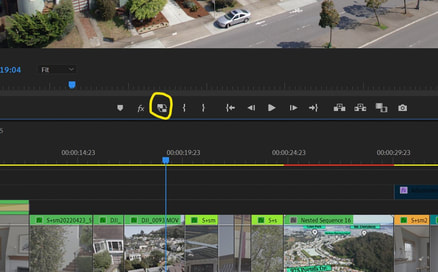
Click on “Ok” and Media Encoder will open up and begin creating proxy files out of all the images in your project. Back in Premiere Pro, all you have to do is toggle the “Proxy” button to switch back and forth between your original file and your proxy file previews. Editing will be so much easier from this point out thanks to proxy files. |
|
Premiere Pro has a button that lets you toggle between the original file and the proxy file, which is an incredibly powerful tool that lightens the load on your computer’s processing power and saves you significant slowdowns and frustrations caused by large file types. We can’t recommend proxy files enough when editing real estate videos.
|
Culling
Back in Premiere Pro, you can use a variety of methods to cull your footage down to the best clips that you’ll be using in the final real estate video. What we like to do though, is create a sequence in 1920x1080p at 23.9 fps labeled “All Clips,” and then drag all the clips onto that timeline. Then scrub through, cutting the best parts of your clips out and dragging them to the second level of the timeline above the original file, labeled V2. Then copy all the files on the v2 timeline to a new sequence with the same settings labeled “Culled.”
Create a third sequence named your address (“844 Western”.) This will be your editing timeline.
Music
When choosing music, unless your client asks for anything specific, we recommend going with something subtle. Each person brings their own creativity to the situation, but generally speaking the song should add to the home instead of distract from it. Ideally instrumental music without vocals works best as well. Again, this category is based a lot more on the needs of the situation and style of the creator.
Creative Storytelling
A typical Real Estate Video tends to follow a typical 3-act story with an intro, body and outro. We’re not directing an Oscar nominee though, so it can be fairly straightforward. Sometimes a chronological tour of the home from the front of the yard into the main area and finishing with the backyard works great. Sometimes you’ll show the most unique and attention grabbing features of the home first. Sometimes the neighborhood is the main seller so that footage will be first. If there’s a script involved, rely heavily on the flow of the narrative as you shoot from room to room. Whatever order you choose to put your clips in, most videos will have an opening shot, sometimes with the address as the title or the real estate agent’s branding on screen.
Open your address sequence “844 Western” and drag the audio track onto the timeline, then add clips in the order you feel is best. If there is agent narration, finding the story should be pretty simple as you match the clips to what the agent is talking about. Match the rhythm of the clips up with the beat of the music and time the video to make it flow together. Watch for accidental black flashes or missing frames between clips. Avoid jarring jump cuts by weaving in tight, medium and wide angles instead of similar looking shots of every room. Find the “hero shot” and open with that, or start with a sequence of some of the properties best features.
Technical Elements
|
Speed Ramps
You can use speed ramps to either speed up or slow down your clips as you move through the home. This can be done to help zoom quickly through some areas or slow a clip down as you need to. Use them wisely. To simply slow a clip down, right click on it, and select “Speed/Duration” and set it to 50%. This will slow the entire clip down. (Note: this only works if you’ve shot at 60fps and are editing on a 24 or 30fps timeline.) |
Alternatively, you can go from slow to fast to slow (and vice versa) through a method called speed ramping.
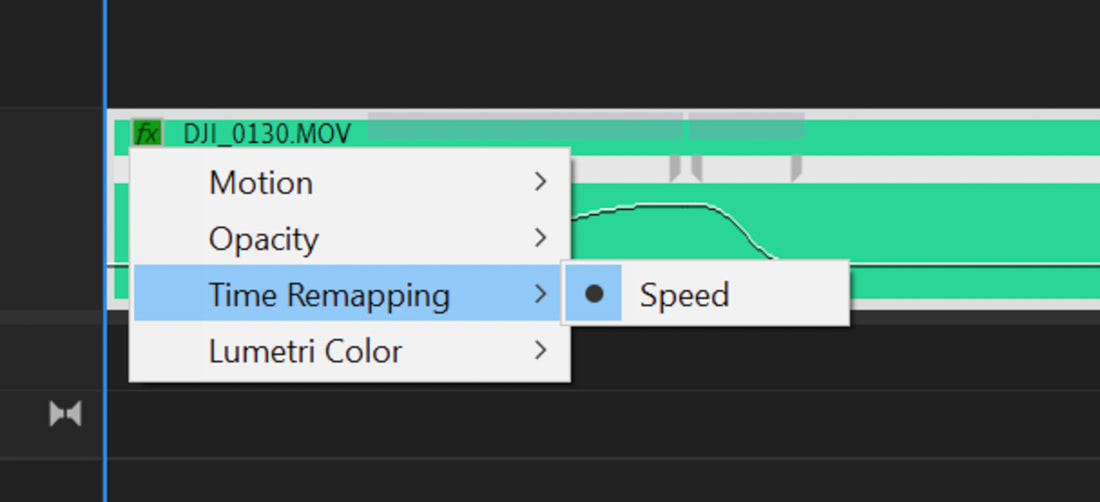
One way to speed ramp is to go to your timeline in Premiere and find the clip you’d like to change the speed of. Right click on the “fx” box on the clip’s top left corner, then select “Time Remapping” then “Speed.” Now you can use your pointer to select the points in the clips that you’d like to adjust. Pull the marker down to slow your clips and drag it up to make it faster. It helps to create a rounded bell curve when using speed ramps to avoid the clips looking too abrupt.
One way to speed ramp is to go to your timeline in Premiere and find the clip you’d like to change the speed of. Right click on the “fx” box on the clip’s top left corner, then select “Time Remapping” then “Speed.” Now you can use your pointer to select the points in the clips that you’d like to adjust. Pull the marker down to slow your clips and drag it up to make it faster. It helps to create a rounded bell curve when using speed ramps to avoid the clips looking too abrupt.
Shot Stabilization
Ideally, your ninja walk skills have given you buttery smooth footage, but there are a couple of tools you can use to get that extra bit of flow that makes all the difference. The first is to simply slow down your clip to 50% like we mentioned before, and the other is to use the Warp Stabilizer tool.
Before you go dragging and dropping Warp Stabilizer onto your clips, there are some requirements. First, Warp Stabilizer and speed cannot be used on the same clips, so first you’ll need to right click on the clip you’d like to stabilize and click on “Nest.” This creates a subsequence of the clip on a separate timeline and replaces it with a nested sequence that matches your timeline’s settings. All you really need to know is that you’ll need to nest each individual clip that you’ve adjusted the speed on before you can apply a Warp Stabilizer. You don’t need to apply Warp Stabilizer to every clip, so only “Nest” the ones that need it.
|
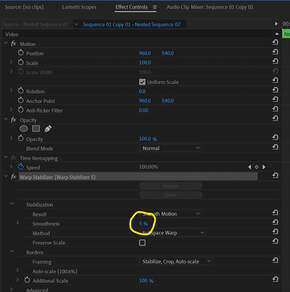
Another thing to remember before applying Warp Stabilizer is that a 5% stabilization looks the best. To change settings, go to the “Effect Controls” panel, then scroll down to “Warp Stabilizer” and change the “Smoothness” to 5%. You can create a preset so that you don’t have to change the smoothness settings every time. To do this, right click on the “Warp Stabilizer” tab in the “Effect Controls” panel. Select “Save Preset,” and name it “Warp Stabilizer 5.”
Now you can drag and drop your Warp Stabilizer preset onto any corresponding clips and let it do its work. |
|
Location Tags
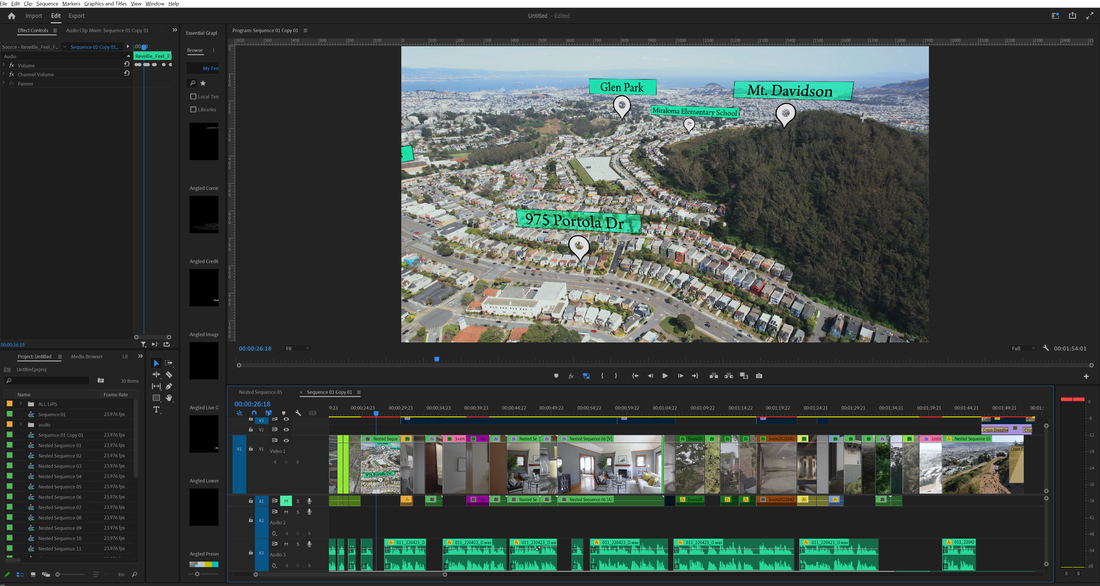
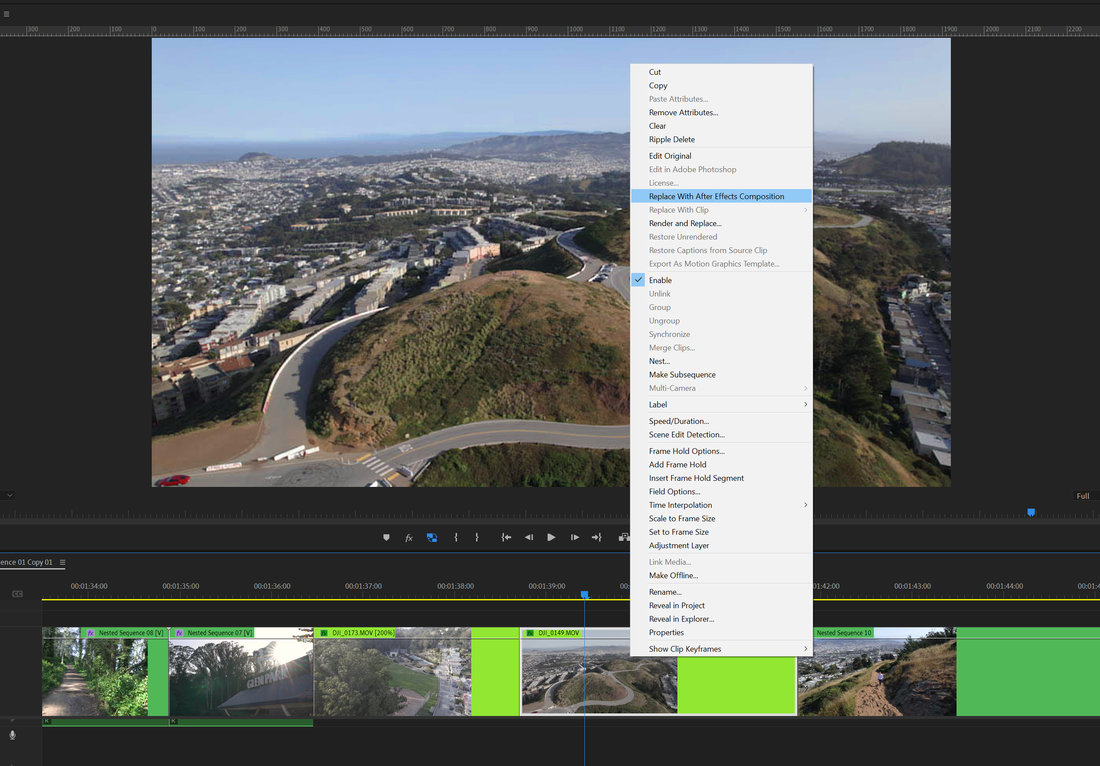
In Premiere Pro, select the clip that you’d like to add the location tags to. Right click and select “Replace with After Effects Composition.” After Effects will open a new project for you to name and save in your project folder. Once the project is open, right click on your clip on the timeline and select “Pre-Compose.” This will create a new composition in AE. |
Go to the “Effects and Presets” toolbar on the left side of the application and search for “3D Camera Tracker.” Drag the “3D Camera Tracker” onto your clip on the timeline and wait for it to analyze. Once it’s done analyzing your clip, it will create a bunch of colored 3D tracker points that you can then select a specific zone with. Find the targeted area that most closely reflects the address of your property and right click to “Create Solid.”
This will create a colored square that we will replace with our location tag file. Right click on the “Track Solid 1” file and select “Pre-Compose.” Rename to the address you’re tagging. In the new composition window, delete the colored square and drag and drop your location tag .png file onto the sequence.
This will create a colored square that we will replace with our location tag file. Right click on the “Track Solid 1” file and select “Pre-Compose.” Rename to the address you’re tagging. In the new composition window, delete the colored square and drag and drop your location tag .png file onto the sequence.
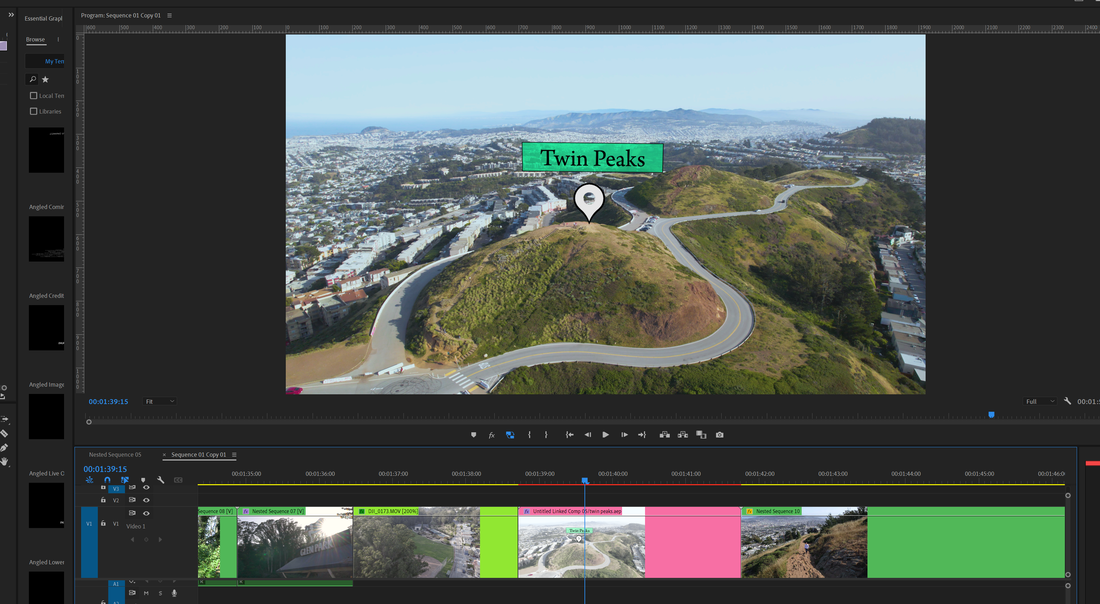
The location tag will now be on your original composition and you can drag and adjust the orientation to make it look just right. Save the After Effects project file and repeat this process to add multiple location tags to your project. All the changes will be synched up and reflected back in Premiere Pro on your project timeline.
Color
If you’ve filmed in a flat color profile, your RAW footage will look washed out and gray, but it actually contains a lot of color information that grants creative freedom and dynamic range when editing. It helps to use a LUT from a professional website (we at Sand and Stone Media use Leeming Luts for our color grading. After initially applying a LUT to your timeline, go through each individual shot and adjust the exposure by bringing down the highlights and raising the shadows to get even light. Adding contrast gives depth to the image since flat color profiles can sometimes struggle with appearing washed out.
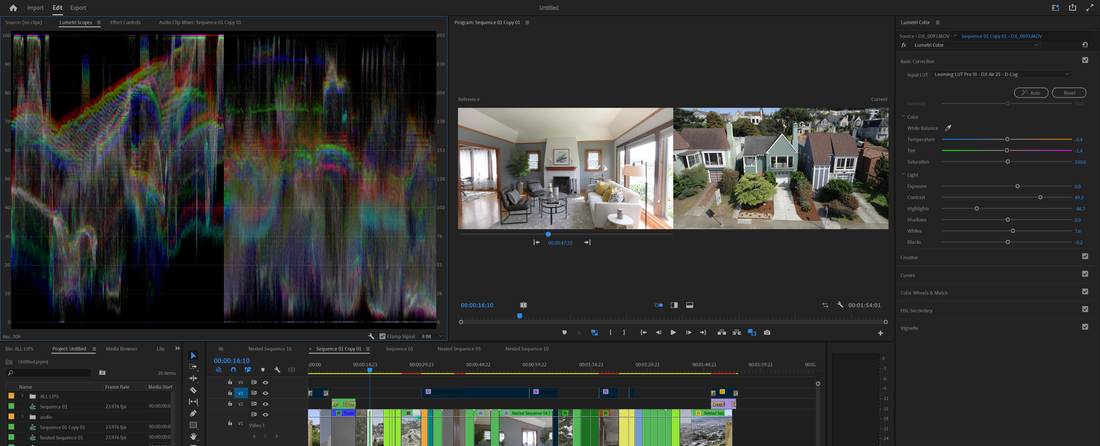
One ideal way to get consistent coloring is to find the clip that you feel represents the tone of the rest of the clips. Sometimes it’s your “Hero Shot” and sometimes it’s the best room in the house, but find essentially the “best clip” in the video and start with that one. Once you’ve edited the coloring of the best clip in the video to look fantastic, toggle the “Comparison View” button in your preview monitor. Now you’ll be able to edit the rest of the clips to match that clip so that you get the most consistent coloring throughout the video. If you use the Lumetri Scopes panel in the top left window, you can use the Histograms to match the exposure levels to keep them all the same.
It can speed up the process to copy and paste the color settings from one clip to the next, but you should still adjust each clip individually after applying the preset. Select the clip you’d like to copy, right click and select “Copy.” Then right click on the clip you’d like to paste the settings onto and select “Paste Attributes,” and make sure that the only thing selected is “Lumetri Color.” Again, once those settings are applied, make any other adjustments.
We recommend taking the time to fine-tune your coloring by practicing and continually looking for resources and courses.
We recommend taking the time to fine-tune your coloring by practicing and continually looking for resources and courses.
Audio
It’s important to consistently keep audio levels between -6 and -12db for most productions. If you have real estate agent narration, adjust the music levels to decrease subtly during their audio and increase subtly during gaps in vocals. This prevents the music from drowning out the agent’s audio. In addition to music and narration, adding wind noises or ocean waves in the background really helps draw the viewer into the video.
It’s important to consistently keep audio levels between -6 and -12db for most productions. If you have real estate agent narration, adjust the music levels to decrease subtly during their audio and increase subtly during gaps in vocals. This prevents the music from drowning out the agent’s audio. In addition to music and narration, adding wind noises or ocean waves in the background really helps draw the viewer into the video.
Export and Delivery
While you can edit and export in 4k, we’ve found that 1080p videos tend to work just fine for the real estate listing community since they’re easiest to share and upload and have short life spans. We recommend exporting at 1920x1080p at 24 fps with a bitrate setting of 20.
Ideal Export Settings in Adobe Premiere 2022 are:
Frame Size: Full HD (1920x1080)
Frame Rate: 23.976
…click on “More” and scroll to
Bitrate Settings: Target Bitrate: 20 mbps
Click Export.
Delivering Real Estate Videos to your client should be relatively easy in today’s world. There are many services like Dropbox, GoogleDrive, WeTransfer and Aryeo that you can upload your videos to and send them as a link to your client for download. Real Estate Videos don’t take up too much space and you are more than likely not sending a long video unless you’re doing an exceptionally large property. Once you’ve sent off the video, there’s a possibility that the realtor or homeowner will request a change or edit. That’s fine, your paying clients have a vision that you’re trying to collaborate on, so give them that benefit and allow 2-3 rounds of editing.
Conclusion
Real Estate Videography is a fun and rewarding trade that comes with plenty of tools to help you get started. It requires knowledge of the camera equipment, but also an eye for composition and an attitude of creativity and preservation of emotion. There are many approaches you can take in capturing properties, but because you read this guide, you’re already ahead of many people who pick up a camera and just try it out themselves.
On starting out and finding clients.
If you haven’t shot your first listing yet, no problem! You’ll need to practice on your own place or maybe friends and family. Likewise you could reach out to a local agency and ask if they have any listings that you can film for free until you get confident enough to charge. Don’t get discouraged if things don’t just start happening right away. Trust the universe and put in the work and you’ll slowly start seeing results. Good luck out there kid!
Santa Cruz, california Real Estate photography and videography. AirBnb photgraphy. About us video. Property walkthrough in Big Sur. Luxury photography Santa Cruz. Luxury real estate videography in Santa Crus. Luxury real estate. Multimillion dollar homes in Santa Cruz videography. 3D Walkthrough, Ranch videography in Santa Cruz. Monterey California, Carmel luxury homes. Luxury videography for Monterey Real Estate. Ranch real estate video. Ranch property videos. Multimillion dollar property videos in Santa Cruz. Capitola, CA. REal estate listings in Santa Crus, California. Drone and aerial images in Aptos. Aerial imagery Santa Cruz. Drone photography and videography in the Bay Area. Bay Area real estate photographer. Drone photography. Drone videography in the Bay Area. Real estate luxury photographer seeking real estate drone video for photo and video use. Venue photographer. Airbnb photography.
